Thursday, December 15, 2016

Sentimental Prints Christmas Thank You ~ A Fun Stampers Journey Card

It's that time of year...time to write some thank yous!  My hubby works for the USPS as a rural mail carrier.  Let's just say that he is BUSY (has been since September) and when people take the time to give him a gift on his mail route he really appreciates it!  And the ever loving wife that I am (who also happens to makes cards) has to help him out with that right?  Plus I get the benefit of all of his goodies too so I suppose I can sacrifice a little! ;)  Every year I whip up a handful of cards and for the past few years I've been making 3x3 cards.  


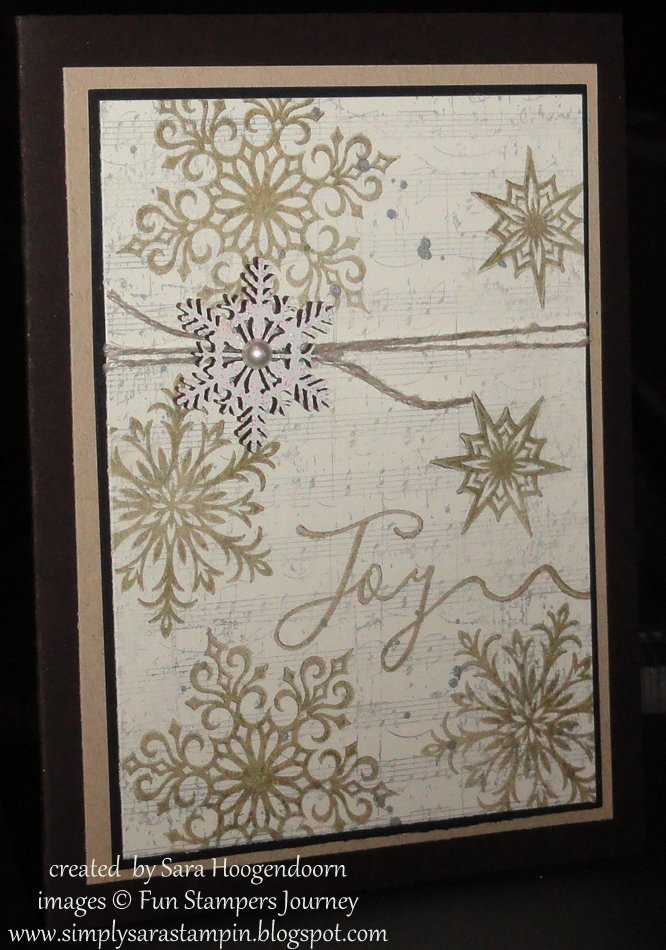
I just can't resist the Bloom Benefits called Pretty Flakes Accents!  I LOVE these snowflakes, so it's a good thing I earned a LOT of them!  I actually had enough to put them on my hot chocolate project from my November open house, on two sets of stamp a stack cards for December and all of these 3x3 cards.  Love that I get Bloom Benefits for every $50 that I spend with Fun Stampers Journey! :)


I think I made about 47 of these small cards.  Usually I have a LOT of gifts on hand before I get them done, but this year I've been ahead of the game...yea me! :)  

Thanks for looking and have a great day!
Sara

I would love to be your Journey Coach! If you are thinking about joining 
Fun Stampers Journey and would like to be a Journey Coach click 
"Join My Team". 
I'd love to have you join me on my journey!  

If you like what you see and want to order just click on the 
"Shop Now" tab at the top of my blog. 

 If you have questions feel free to contact me. 
Just click "Contact Me" at the top of my blog . 

Supplies used on this card


Stamp Sets:
Sentimental Prints
Card Stock:
Specialty Paper Pearled Basics & Journey Brush Silver
Ink Pads:
Journey Silver
Supplies:
Bloom Benefit - Pretty Flakes Accents, Journey Silver Silk, 
Cut Rhinestones & Journey Glue Dots

Monday, December 12, 2016

Frosty Fun ~ A Fun Stampers Journey Card

Are snowflakes blue?  Nope! But they are on today's card!  
This is another  December stamp a stack a card that I prepped for my ladies to make. :)


Who doesn't love a cute snowman?  And it can be a card for Christmas or someone's birthday...or a thank you or thinking of you.  Maybe a just because too.  Yup, it could be a card for a lot of occasions. :)


It looks like I layered four pieces of card stock, but I only have two layers plus a frame.  I popped up one of the frames, but you can't tell it in any of the pictures.


This was a pretty easy card to make!  I stamped the snowman using Black Licorice, blocked off the bottom part of the snowman so I could sponge a hill, stamped the snowflakes using Beach Ball, colored in the scarf and holly on the hat with reinkers and a blending brush, then assembled my card...whew, that was a long sentence! I also put on the pearls and stamped the sentiment on the front and one inside the card.  Easy as that! :) 


Thanks for looking and have a great day!
Sara

I would love to be your Journey Coach! If you are thinking about joining 
Fun Stampers Journey and would like to be a Journey Coach click 
"Join My Team". 
I'd love to have you join me on my journey!  

If you like what you see and want to order just click on the 
"Shop Now" tab at the top of my blog. 

 If you have questions feel free to contact me. 
Just click "Contact Me" at the top of my blog . 

Supplies used on this card


Stamp Sets:
Frosty Fun & Every Day
Card Stock:
Beach Ball, Beach Breeze & Whip Cream
Ink Pads:
Beach Ball & Black Licorice
Supplies:
Sponges, Blending Brush, reinkers, pearls

Saturday, December 10, 2016

Snow Buddy ~ A Fun Stampers Journey Card

Last week I posted a card with feathers on it and a couple of weeks ago I posted one with leaves on it.  Why am I telling you this?  Because both of those cards and today's cards are all the same card! Yup, the same card stock, just stamped with different images.  How fun is that?  


I needed five winter cards for this month's stamp a stack and I wanted to use something other than blue.  Don't get me wrong I love blue cards, but I needed a change of color.


I stamped the background stamp Vintage Notes lightly with silver, then added the snow flakes in gold with the stamp set snow buddy.  I also added "joy" just in case someone wanted to use it as a Christmas card instead of a winter card.  


For finishing touches I added a bit of silver silk, tied on some natural journey thread, added a snowflake from the bloom benefit Pretty Flakes Accents and pearl in the middle of the snowflake.


Thanks for looking and have a great day!
Sara

I would love to be your Journey Coach! If you are thinking about joining 
Fun Stampers Journey and would like to be a Journey Coach click 
"Join My Team". 
I'd love to have you join me on my journey!  

If you like what you see and want to order just click on the 
"Shop Now" tab at the top of my blog. 

 If you have questions feel free to contact me. 
Just click "Contact Me" at the top of my blog . 

Supplies used on this card


Stamp Sets:
Snow Buddy, Vintage Notes & Holiday Script
Card Stock:
Dark Roast, Oatmeal Cookie, Black Licorice & Buttercream
Ink Pads:
Journey Gold & Journey Silver
Supplies:
Pretty Flakes Accents, Pearls, Naturals Journey Thread

Tuesday, December 6, 2016

Stay Wild - The Peace of Christmas ~ A Fun Stampers Journey Card

I have another card for this week's sketch challenge over at Try Stampin' or Not on Tuesday.  Now this was a fun sketch to work with, but I went a little crazy again and turned that sketch upside down!  


Here's the sketch we had to work with and all I could see was a big ol' moon popping out from behind the mountain even though I was looking at it upside down! lol

Make sure you stop over at Try Stampin' on Tuesday Here and check out all the other cards made by the design team.  So fun to see what everyone else created with the sketch.  If you get a chance make sure you play along.  We'd love to see what you create!


To create this scene I started by stamping a background stamp called Vintage Notes onto Buttercream card stock using the Journey Gold ink pad (I wanted the moon to have something inside of it, so I had to start with what is the farthest in the background and move my way forward...if that makes any sense!).  Then a ripped a piece of scrap paper so I had a mountain shape ripped out.  I sponged the whole mountain with Pretty Amethyst, then added Deep Lilac and sponged from the top of the mountain down, but didn't do about the bottom 1/4 of it.  Last I sponged using the color Pretty Pansy and once again started at the top and sponged down about half way.  Next I cut out a circle for the moon and used the inside of the scrap that I had ripped out of the mountain to cover the mountain up and and the moon so I could sponge over the rest of the card without ruining the mountain that I had already sponged and to make the moon stand out.  I once again started with Pretty Amethyst and sponged over the whole card (except the mountain and moon because they are covered), then added Deep Lilac, but stuck closer to the edges. The last color once again was Pretty Pansy and I just barely touched on the left and right edges, but did the top and corners down a little farther.  I added "peace" over the moon using Deep Lilac and stamped the trees using one of my favorite stamps "Stay Wild".  I stamped that with Deep Lilac as well.  I added three pearls to finish off the card.


Thanks for looking and have a great day!
Sara

I would love to be your Journey Coach! If you are thinking about joining 
Fun Stampers Journey and would like to be a Journey Coach click 
"Join My Team". 
I'd love to have you join me on my journey!  

If you like what you see and want to order just click on the 
"Shop Now" tab at the top of my blog. 

 If you have questions feel free to contact me. 
Just click "Contact Me" at the top of my blog . 

Supplies used on this card are all from Fun Stampers Journey


Stamp Sets:
Stay Wild & Vintage Notes
Card Stock:
Deep Lilac & Buttercream
Ink Pads:
Journey Gold, Pretty Amethyst, Deep Lilac & Pretty Pansy
Supplies:
Pearls & Sponges

Monday, December 5, 2016

Flock Together ~ A Fun Stampers Journey Card

Do you remember the Autumn Days Birthday card I posted a little while ago with leaves and gold silk?  Well today's card was made using all the leftovers I had of that card from my open house.  For some reason I had a lot more extras of that card than the rest of what I created!  Guess I didn't count very well when I was prepping that card. lol


As you can tell I didn't use any of the same stamps.  I needed an anniversary card and also wanted to use a set I hadn't used before even though I've had it pretty much since I started Fun Stampers Journey at the end of August.


All I did was stamp four feathers, emboss two of them with black and two with gold...and fussy cut them!  Then of course I put them on the card and popped a couple of them up, added some gold and dark roast silks, used some leftover twine I had and stamped "celebrate" on the bottom of the card.  Nice and easy! :)


Thanks for looking and have a great day!
Sara

I would love to be your Journey Coach! If you are thinking about joining 
Fun Stampers Journey and would like to be a Journey Coach click 
"Join My Team". 
I'd love to have you join me on my journey!  

If you like what you see and want to order just click on the 
"Shop Now" tab at the top of my blog. 

 If you have questions feel free to contact me. 
Just click "Contact Me" at the top of my blog . 

Supplies used on this card


Stamp Sets:
Flock Together & Tag Elements
Card Stock:
Black Licorice, Dark Roast, Oatmeal Cookie & Buttercream
Ink Pads:
Dark Roast & Clear Pigment Ink
Supplies:
Journey Black and Gold Embossing Powder, 
Gold and Dark Roast Silks,
Journey Natural Thread  & Details Pro Shears

Sunday, December 4, 2016

Greeting Bouquet ~ A Fun Stampers Journey Card

Today's card is the card I made for all of my ladies who ordered from me in October and November.  I love how this card turned out, so I hope they all liked their cards too. :)


Just a quick picture of a stash of them. :)


This card wasn't too hard to make at all...except fussy cutting the embossed flowers out.  That wasn't hard to do it just took a little bit of time, but it was worth it! :)


Thanks for looking and have a great day!
Sara

I would love to be your Journey Coach! If you are thinking about joining 
Fun Stampers Journey and would like to be a Journey Coach click 
"Join My Team". 
I'd love to have you join me on my journey!  

If you like what you see and want to order just click on the 
"Shop Now" tab at the top of my blog. 

 If you have questions feel free to contact me. 
Just click "Contact Me" at the top of my blog . 

Supplies used on this card are all from Fun Stampers Journey


Stamp Sets:

Greeting Bouquet
Card Stock:

Cool Pool & Whip Cream
Ink Pads:

Clear Pigment Ink
Supplies:
Artful Burst Die Set, Journey White Embossing Powder,
Cool Pool Satin Ribbon, Craft Glue, Heat Gun & Details Pro Shears

Thursday, December 1, 2016

Deer Pose ~ A Fun Stampers Journey Card

Today I have a quick post for you (and hopefully I will be posting more a little more regularly again!).  Anyway I needed a masculine card for my brother-in-law's birthday last week and since he's a hunter I figured the stamp Deer Pose would be the one to use.  


Since I love trying my hand at watercolor and haven't done it in a while I figured it was time to get busy again.  I didn't actually watercolor this though.  I used Fun Stampers Journey reinkers and mixed them with something called Fusion Blender to get this look.  It was very quick and easy to do!  I didn't need to wait for anything to dry, no bleeding where I didn't want it too and my stamped images didn't fade.  :)


If you have FSJ reinkers and fusion blender you should give it a try!


Thanks for looking and have a great day!
Sara

I would love to be your Journey Coach! If you are thinking about joining 
Fun Stampers Journey and would like to be a Journey Coach click 
"Join My Team". 
I'd love to have you join me on my journey!  

If you like what you see and want to order just click on the 
"Shop Now" tab at the top of my blog. 

 If you have questions feel free to contact me. 
Just click "Contact Me" at the top of my blog . 


Tuesday, November 22, 2016

Summer Rose ~ A Fun Stampers Journey Card

I finally have another card to share with you all today and it's inspired by this week's sketch challenge #298 over at Try Stampin' or Not on Tuesday.  Boy was this sketch a challenge for me!  I really like the sketch, but my creativity was just off or something.  I ended up creating a card, didn't really like it and started another one instead.


Usually the first picture showing my card is on an angle and the picture looking directly at the card is in the middle.  I switched things up a bit today because only one angle of my card showed the Gold Shimmer Color Splash.  That's one of the things I love about the card...the shimmer on the leaves and Roses, so I had to show it first. :)


Make sure you check out all the cards the other designers made HERE...they are great this week!!


I used the sketch, but definitely took things to a different level. lol  I used a background stamp for the middle rectangle, a small rose for the smallest rectangle and turned my card 90 degrees!  


Thanks for looking and have a great day!
Sara

I would love to be your Journey Coach! If you are thinking about joining 
Fun Stampers Journey and would like to be a Journey Coach click 
"Join My Team". 
I'd love to have you join me on my journey!  

If you like what you see and want to order just click on the 
"Shop Now" tab at the top of my blog. 

 If you have questions feel free to contact me. 
Just click "Contact Me" at the top of my blog . 


Friday, November 18, 2016

Autumn Days Birthday ~ A Fun Stampers Journey Card

Do you ever feel like you're in a slump with your creativity?  I'm sure most of us have!  Let me tell you I sure have felt that way this week and haven't created much at all. :(  Maybe I just needed a break.  Today's card is one that I created earlier this month for my open house.  I wouldn't call it a fall card even though it has leaves on it.  Guess I was looking for  more of a masculine card since my other card was a feminine one.


I started by stamping a background stamp with Oatmeal Cookie.  I didn't try to get the whole stamp inked up.  I just wanted color here and there.  After that I stamped all the leaves.  To get the various colors I started by stamping the whole stamp using the Oatmeal Cookie ink pad, then I tipped the stamp so I was just getting the edges in the ink, using both Dark Roast and Black Licorice.  After I had all three colors on  it then I would stamp it.  Not sure if that makes sense, but that's how I got the different colors. :)


After stamping everything I put a bit of Gold Silk on it and finished assembling the card.


Thanks for looking and have a great day!
Sara

I would love to be your Journey Coach! If you are thinking about joining 
Fun Stampers Journey and would like to be a Journey Coach click 
"Join My Team". 
I'd love to have you join me on my journey!  

If you like what you see and want to order just click on the 
"Shop Now" tab at the top of my blog. 

 If you have questions feel free to contact me. 
Just click "Contact Me" at the top of my blog . 

Supplies used on this card


Stamp Sets:
Autumn Days p. 70 (SS-0006) $17.95
Graduated Dots p. 230 (SS-0117) $12.95
Tag Elements p. 199 (AT-0130) $7.95
Card Stock:
Black Licorice p. 289 (CS-0003) $6.95
Dark Roast p. 288 (CS-0091) $6.95
Buttercream p. 288 (CS-0006) $6.95

Ink Pads:
Oatmeal Cookie p. 288 (IP-0011) $7.95
Black Licorice p. 289 (IP-0041) $7.95
Dark Roast p. 288 (IP-0050) $7.95

Supplies:
Mini Wooden clothespins p. 308 (AC-0029) $4.95
Journey Natural Thread p. 310 (AC-0133) $5.95

Saturday, November 12, 2016

Autumn Days - Again! ~ A Fun Stampers Journey Card

I have a feeling these are the last fall cards I'll be posting in a while.  Yuppers, the color here in my part of Michigan is pretty much gone.  There's an occasional tree here and there that are a little behind with some bright red, yellow or rust color still around, but they'll be gone soon enough...I sure did enjoy the show while it lasted though!  I had to create a couple more cards to extend fall just a little longer...and because I had a lot of left over leaves I needed to use!


So the top card shows a little Gold Shimmer Color Splash, but the bottom shows a ton.  It's just the way the light is hitting it because it's not as shiny as what you see below!


I added Gold and Bronze Silks to each of my cards too.  I had just bought them and couldn't resist trying them out!


This is the second card I made...


I like the layout of my first card better, but I think I like the colors on this card more. 


I definitely didn't use as much of the silks on this card.  I was new at using them on the first card, so I wasn't quite as heavy-handed on the second card. lol  I do have a few pictures from an earlier post HERE that show how I created the leaves if you're interested in checking it out.  I just made these colors a little darker and more intense than on the cards in that post.


Thanks for looking and have a great day!
Sara

I would love to be your Journey Coach! If you are thinking about joining 
Fun Stampers Journey and would like to be a Journey Coach click 
"Join My Team". 
I'd love to have you join me on my journey!  

If you like what you see and want to order just click on the 
"Shop Now" tab at the top of my blog. 

 If you have questions feel free to contact me. 
Just click "Contact Me" at the top of my blog . 

Supplies used on this card


Stamp Sets:
Autumn Days BUNDLE p. 70 (BD-0054) $30.50
(sentiment is printed) 

Card Stock:
Buttercream p. 288 (CS-0006) $6.95 

Ink Pads:
Pumpkin Bread p. 289 (IP-0057) $7.95

Supplies:
Rich Sorbet, Party Pop & Mother Nature Pan Pastels p. 280 $49.95 each
Gold Silk p. 291 (IP-0096) $4.95
Bronze Silk p. 291 (IP-0091) $4.95


Tuesday, November 8, 2016

Lovely Day ~ A Fun Stampers Journey Card

Today's card is inspired by Try Stampin' or Not on Tuesday's sketch challenge #296.  This week we also have an optional theme of Thanksgiving, but I opted for something different because of my open house later this week.


What a fun sketch to work with!  Make sure you check out all the other fun creations at Try Stampin' on Tuesday HERE.  We'd love to see what you create if you get a chance to play along. :)


I used Pan Pastels to color in the flower petals because it's so quick and easy to do. :)


Some dry embossing for the background and a few pearls to finish off my card. :)


Thanks for looking and have a great day!
Sara

I would love to be your Journey Coach! If you are thinking about joining 
Fun Stampers Journey and would like to be a Journey Coach click 
"Join My Team". 
I'd love to have you join me on my journey!  

If you like what you see and want to order just click on the 
"Shop Now" tab at the top of my blog. 

 If you have questions feel free to contact me. 
Just click "Contact Me" at the top of my blog . 

Supplies used on this card


Stamp Sets:
Lovely Day p. 58 (AT-0188) $7.95
Sentimental Prints p. 206 (SS-0072) $19.95


Card Stock:
Pool Play p. 288 (CS-0092) $6.95
Black Licorice p. 289 (CS-0003) $6.95
Whip Cream p. 289 (CS-0040) $6.95


Ink Pads:
Pool Play p. 288 (IP-0051) $7.95
Black Licorice p. 289 (IP-0041) $7.95


Supplies:
Petals Wall Embossing Folder p. 264 (EF-0007) $4.95
Party Pop Pan Pastels p. 280 (JM-0081) $49.95
Pearls p. 307 (AC-0024) $3.95