Sunday, June 14, 2015

Beautiful Blue Butterfly

I just wanted to get a quick post out showing a cute card I made using a bit of the old with a bit of the new. :)


It's one of the cards I'm having the ladies make for this month's stamp a stacks.  It's a very simple one to make so I know they'll like that! :)


Just a bit of a close up for you to see...


Thanks for looking and have a great day!
Sara

I would love to be your demonstrator! If you like what you see and want to order anything just click on any of the products that I've listed at the bottom of my blog or click on the "Shop Now" tab at the top of my blog. Any of them will take you directly to my website! If you have questions feel free to contact me. Just click "Contact Me" at the top of my blog . If you're thinking of becoming a demonstrator click "Join My Team". I'd love to have you join me!

Supplies used on  this card:


Built for Free Using: My Stampin Blog

Thursday, June 11, 2015

Holiday Home Happiness

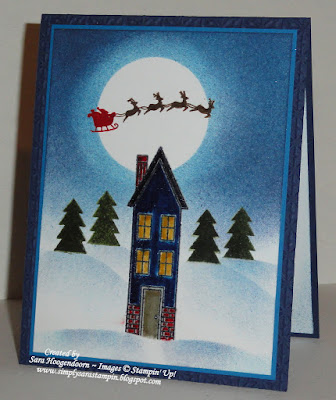
I've been enjoying some warm weather here in Michigan...finally!  So what am I doing making Christmas cards?  Making them for 'Tis the Season's Christmas card challenge blog of course.  This week we have a fun inspiration challenge for you.  I looked at the sketch waaaay back in April and knew what I was going to do.  Then I started working on it and have to admit I did not think it was going to turn out at all.  I started with the red sleigh, brown reindeer and green trees since I embossed them.  I took one look and thought, "That is U G L Y!". lol  Glad I stuck it out because I had fun making this card and seeing it develop into something even better than I imagined it would! :)


This is the inspiration challenge.  Make sure you head over to 'Tis the Season HERE to check out the rest of the design team's cards because they are so fun!  What will this picture inspire you to make?  We'd love to see it and have you play along!


I had to stick this picture in because it shows a bit of the shimmer I spritzed onto the card after my sponging was done. :)


I hope you had as much fun looking at this card as I did creating it...just a lot less time on your part! lol


Thanks for looking and have a great day!
Sara

I would love to be your demonstrator! If you like what you see and want to order anything just click on any of the products that I've listed at the bottom of my blog or click on the "Shop Now" tab at the top of my blog. Any of them will take you directly to my website! If you have questions feel free to contact me. Just click "Contact Me" at the top of my blog . If you're thinking of becoming a demonstrator click "Join My Team". I'd love to have you join me!

Supplies used on this card:

Sticky Notes
Holiday Home Stamp Set (retired)
Stampin' Write Markers used since I can only list the color groups:
Real Red, Cherry Cobbler, Mossy Meadow, Sahara Sand, Crumb Cake,
Soft Suede, So Saffron, Daffodil Delight, Night of Navy & Pacific Point


Built for Free Using: My Stampin Blog


Tuesday, June 9, 2015

Clean and Simple Birthday with 2015-2017 In Colors

Today I have a very clean and simple card for you using this week's sketch from Try Stampin' or Not on Tuesday using the new 2015-2017 In colors from Stampin' Up!  I never know if I'm going to like the next set of In Colors when I first see them and that was definitely the case with this group...I was pretty skeptical, but thought I'd better get them out and try them before I judged them too harshly.  Well I ended up really liking them so I can't complain! lol


Here's this week's sketch from Try Stampin' and I love it!  I just really like the sketches we have over there.  They are usually pretty simple, but help me create a lot of cards that I end up loving. :)  Head over to their blog HERE to see all the other great cards by the team's designers and play along with us too.  We'd love to see what you create!


Just a couple more pics to check out...


Thanks for looking and have a great day!
Sara

I would love to be your demonstrator! If you like what you see and want to order anything just click on any of the products that I've listed at the bottom of my blog or click on the "Shop Now" tab at the top of my blog. Any of them will take you directly to my website! If you have questions feel free to contact me. Just click "Contact Me" at the top of my blog . If you're thinking of becoming a demonstrator click "Join My Team". I'd love to have you join me!

Supplies used:  


Built for Free Using: My Stampin Blog

You're in My Thoughts

Just a quick post for now since I want to join the Pretty Pink Posh Watercolor Blog Hop and don't have a lot of time left.  I kept telling myself I had plenty of time when it first started, but the time to play is about done!!  I couldn't resist playing because I've been messing around with water coloring a bit lately, but boy do I have SO much to learn!  Next I get to enjoy looking over hundreds of cards that were entered just to check out everyone's water coloring.  I have a feeling that's going to take a while, but it will be so fun to see what everyone else does!  


Thanks for looking and have a great day!
Sara

I would love to be your demonstrator! If you like what you see and want to order anything just click on any of the products that I've listed at the bottom of my blog or click on the "Shop Now" tab at the top of my blog. Any of them will take you directly to my website! If you have questions feel free to contact me. Just click "Contact Me" at the top of my blog . If you're thinking of becoming a demonstrator click "Join My Team". I'd love to have you join me!

Supplies used on this card:

Built for Free Using: My Stampin Blog


Monday, June 1, 2015

Best Thoughts in Watercolor

Today I a have a couple of cards to show you that are made with the same stamp but using different colors.  I've had this new stamp sitting around for over a week and I've wanted to try some water coloring and finally had a chance to do it.  As I was looking through some blog challenges I noticed that the Friday Mashup is all about water coloring with a very open sketch.  Perfect for what I wanted to do.


I made these for my daughter's best friend and her mom.  They lost their grandma and mother so I wanted to make something special for each of them.


I know...I have a lot of pics so I hope you'll bear with me while I post a few of each.  I've enjoyed trying out water coloring ever since I saw a video by Heather Telford on Splitcoast back in November or December.  She makes amazingly beautiful cards and I've sat down and made a few here and there because I enjoy it so much and because I wanted to have my images colored in.  I figured I'd use my aqua painters and ink since Stampin' Up! got rid of their Blendabilities and I couldn't color things in with them anymore.  Oh...if you'd like to check out Heather's work click HERE.  This link will show you one of her videos, then you can scroll through the rest of her blog if you'd like. :)


I forgot to add that I actually started with this card because when I think of hydrangeas these are the colors I think of.  When I wanted to do other colors for the second card I looked for pics of orange and yellow hydrangeas and they are actually out there too!  I knew there were blue, purple, green and pink, but I didn't know they come in orange and yellow too.  Guess I learned something new today. :)  Both of these cards were pretty easy to make.  I just used sponges and sponge daubers to get the colors on my stamp, but used a marker for the leaves.  I spritzed the stamp a couple of times and stamped it onto my watercolor paper.  After that I used an aqua painter to fill in the colors of the flowers and leaves.  I did use my stamp-a-ma-jig to re-stamp the image because I didn't think it was defined enough anymore.  I actually just re-spritzed my stamp instead of re-inking the whole thing again.  To get the blue background on each of the cards I just made sure the watercolor paper was wet...not too wet, but not so little wetness on it that it would dry right away.  I started going around the flower, leaves and stem and let the wet watercolor paper pull the color out away from the flower (the flower is dry when I do this!).  If I want it darker I just go back in and repeat making sure my aqua painter isn't quite as wet (but the watercolor paper still is) and get some more ink from my ink pad (in the lid).  I did tape off each of these pieces before I painted them to give them the border you can see.  I used masking tape and carefully pulled it off when the ink was dry (yes, I use my heat gun if I get sick of waiting for it to dry! lol  I also run it through my Big Shot if the paper is warped.  I just put it under an embossing folder instead of inside it.  That straightens it out in a jiffy!). 


Thanks for looking and have a great day!
Sara

I would love to be your demonstrator! If you like what you see and want to order anything just click on any of the products that I've listed at the bottom of my blog or click on the "Shop Now" tab at the top of my blog. Any of them will take you directly to my website! If you have questions feel free to contact me. Just click "Contact Me" at the top of my blog . If you're thinking of becoming a demonstrator click "Join My Team". I'd love to have you join me!

Supplies used on this card:

Water Color Paper


Built for Free Using: My Stampin Blog

Thursday, May 28, 2015

Merry Christmas

Hi Everyone, I'm here to show you another Christmas card today. :) We have a fun sketch over at 'Tis the Season, so it's pretty much anything goes on your card as long as it's Christmas and you use the sketch.  I hauled out a set I haven't used in a while called Beauty of the Season.  It's definitely helped me make a few beautiful cards. :)  


Make sure you head over to 'Tis the Season HERE to check out the other fun Christmas cards and to play along too.  We'd love to see what you create!  Plus you'll love getting a head start on your Christmas card stash. :)  We are also looking to add to our Design Team.  If you like to make Christmas cards and want to be a part of our team head to our blog and check out the details. :)


This was a pretty simple card to make.  I used StazOn black to stamp my images on watercolor paper and used my aqua painter to color everything in.  The colors I used will be listed below in my supplies.  Oh I also used my Northern Flurry embossing folder because I have a hard time leaving something blank even though it wasn't that much space!  I guess I just needed the card to look a little more winterish or something. 


Thanks for looking and have a great day!
Sara

I would love to be your demonstrator! If you like what you see and want to order anything just click on any of the products that I've listed at the bottom of my blog or click on the "Shop Now" tab at the top of my blog. Any of them will take you directly to my website! If you have questions feel free to contact me. Just click "Contact Me" at the top of my blog . If you're thinking of becoming a demonstrator click "Join My Team". I'd love to have you join me!

Supplies used on this card:

Built for Free Using: My Stampin Blog

Tuesday, May 26, 2015

Simply Sketched in Watercolor

As you can tell I've been into water coloring lately!  It was my mom's birthday and I wanted to make a nice card for her so I worked ahead (for once!) and used Try Stampin' on Tuesday's sketch #220.  I tried to use a set that's retiring, Blooming with Kindness, but just didn't like how anything turned out so I pulled out the retired set Simply Sketched.


This is the sketch I used.  As you can tell I left mine pretty clean and simple.  I water colored the circles on the three pieces that stick out too.  Nothing else looked right because whatever I used just wasn't soft enough to match the painted panel.


Make sure you head over to Try Stampin' on Tuesday HERE to check out the other great cards made by the team.  They are quite lovely!  If you get a chance give it a try too.  We'd love to see what you create. :)


I used Coastal Cabana and Wild Wasabi Stampin' Write markers to stamp the image, then blended the colors using the small aqua painter tip.  Once the flower was dry I added the wash using Pool Party and Wild Wasabi ink pads.  I made sure I worked on a wet area, but not a overly wet area so the color wouldn't wash out too much or run everywhere.  Then as I moved to the next area I made sure it was wet too so I didn't have streaky areas that had already dried.  Not sure if that makes any sense, but that's how I got it to blend and flow and mix the colors the way I did.  I did go back and add more green to the stems after everything was dry (and, yes, I get impatient and use my heat tool to dry things fast! lol).  As you can see it looks like I used a little So Saffron (yellow), but I didn't.  You never know how Stampin' Up! inks are going to blend and bleed when adding water.  Since it's all I have that's what I use and I think it's working out pretty good so far. :)


Thanks for looking and have a great day!
Sara

I would love to be your demonstrator! If you like what you see and want to order anything just click on any of the products that I've listed at the bottom of my blog or click on the "Shop Now" tab at the top of my blog. Any of them will take you directly to my website! If you have questions feel free to contact me. Just click "Contact Me" at the top of my blog . If you're thinking of becoming a demonstrator click "Join My Team". I'd love to have you join me!

Supplies used on this card:

Retired Stampin' Up! set Simply Sketched  
Masking tape to mask the watercolor paper

Built for Free Using: My Stampin Blog