Monday, May 9, 2011

Because I Care - Stamping 411 Challenge

Today I am finally getting back to entering cards into challenges!  This card is for Stamping 411  Challenge 202 using one of my favorites sets ~ Because I Care.  I was able to make this on Saturday while I was at an all day craft day!  I didn't get as much done as I had hoped because I had to leave a couple of times to help out with other things, but we sure had a blast together!


A close up of the hydrangea using heat and stick powder.


I couldn't resist taking a close up of the butterflies...


Thanks for looking and have a great day!

Stamp Set:  Because I Care
Card Stock:  Marina Mist, Pretty in Pink & Whisper White
Classic Stampin' Pads:  Marina Mist, Pretty in Pink & Wild Wasabi
Versa Mark, Heat & Stick Powder & Dazzling Diamonds Stampin' Glitter
Punches:  Scallop Trim Border & 1 3/8" x 5/8" Oval
Big Shot Embosslits Die:  Beautiful Wings
Big Shot Embossing Folder:  Perfect Polka Dots
Jewels:  Basic Pearls


Saturday, May 7, 2011

Left Overs Part 4

Today's card is another left over that I finally got around to making!  It was a quick one to come up with because once the base of the card was put together all I had to do was stamp the flower, pour on heat and stick powder, heat it, pour on Dazzling Diamonds and heat again.  Then I sprayed the flower with shimmer paint and sponged the edges with ink.  I did the same with the Happy Birthday oval, added the rhinestones and I was done!


A little closer view of the flower...


Thanks for looking and have a great day!

Stamp Set:  Fabulous Florets
Card Stock:  Old Olive & Whisper White
Classic Stampin Pads :  Old Olive & Rich Razzleberry
Versa Mark
Big Shot Texturz Plates:  Backgrounds 1
Punch:  1 3/4" x 7/8" Oval
Heat and Stick powder with Dazzling Diamonds
Shimmer Paint:  Champagne Mist
Jewels:  Basic Rhinestones


Thursday, May 5, 2011

Fabulous Florets ~ Thank You

Today's card is my first one using the new set Fabulous Florets from the Summer Mini! 


Here's a close up to show some of the shimmer using Heat and Stick powder with Dazzling Diamonds.


My daughter likes the diamonds  by the "Thank You".


Most of the time I like to put a little something on the inside of the card.  I can't just have the outside looking nice. :)


Thanks for looking and have a great day!

Stamp Sets:  Fabulous Florets & Because I care
Card Stock:  Rich Razzleberry, Wild Wasabi, Daffodil Delight & Whisper White
Classic Stampin' Pads:  Rich Razzleberry, Wild Wasabi & Daffodil Delight  
Versa Mark
Punches:  Decorative Label & Word Window
Big Shot Embossing Folders:  Perfect Polka Dots and Square Lattice
Shimmer Paint:  Champagne Mist
Jewels:  Basic Rhinestones


Tuesday, May 3, 2011

Coast to Coast

Today's birthday card is made from one of my favorite masculine stamp sets Coast to Coast.  I know...it's retired, but my family doesn't know and wouldn't care anyway.  They just let me know they appreciate the b-day cards that I send their way.  This one is for my brother-in-law Scott.  So Happy Birthday, Scott!


Thanks for looking and have a great day!

Stamp Set: Coast to Coast & On Your Birthday
Card Stock:  Basic Black, Basic Grey & Whisper White
Classsic Stampin' Pads:  Basic Black & Basic Grey
Big Shot Texturz Plates:  Backgrounds 1
Punch:  Modern Label
Black Brads


Monday, May 2, 2011

Thank You

Today's "Thank You" card is one of the cards I had the ladies make at my stamp a stack.  Last week I posted one similar to this and actually got the idea for the black and white thank you from this card.  Ok, so it's actually two cards...I just couldn't decide on which colors to use for the stamp a stack.  By popular vote (of everyone in my house at the time) Marina Mist, Wild Wasabi and Perfect Plum won.


Thanks for looking and have a great day!

Stamp Sets:  Elements of Style & Thank You Kindly
Card Stock:  Whisper White
Classic Stampin' Pads:  Marina Mist, Wild Wasabi & Perfect Plum,
 Daffodil Delight, Pumpkin Pie & Real Red
Jewels:  Basic Pearls

To get the Wild Wasabi, Marina Mist or the Daffodil Delight, Pumpkin Pie colors just make a template that's 5x5 and cut out a square or rectangle wherever you want the color on the card.  Ink up your sponge and tap it where you cut out your square until you get the color as dark as you want it.  Do the same with the second color and blend as needed in the middle.  Pull the template off and stamp the vine over the two colors you just sponged. 


Friday, April 29, 2011

With Sympathy

This is one of the cards I had the ladies make at my first stamp a stack.  I love this color combo!  It's very soft and soothing to me.


Thanks for looking and have a great day!

Stamp Set: Elements of Style & Peace and Comfort (retired)
Card Stock:  Soft Suede, Very Vanilla and Crumb Cake
Classic Stampin' Pad:  Soft Suede
Punch:  Decorative Label
Ribbon:  5/8" Satin in Very Vanilla

Card Box

Wow, I'm a little slow this week putting anything on my blog. :(  Yup, it's been a busy week, but I must admit it's nice to take a little break every now and then.  Today I decided to post a "box" instead of my usual card.  I've been seeing a lot of beautiful cards lately that are 3-D...I've even made a few myself.  But I've been wondering how are you suppose to give those kind of cards away?  I don't want to hand a card to someone that's not in an envelope, but they don't fit in them!  I started looking around for tutorials for boxes and figured with all the time I spent looking I could be busy making something.  So that's what I did, and this is what I came up with for a card I made earlier for a challenge.


A picture with the box all set to give away.  Still not sure how I'd mail this though.  You'd think with my husband working for the Post Office I'd have something up my sleeve!


I had to show a picture with the card inside the box.


And finally a close up of the flowers.

Thanks for looking and have a great day!

Here are the instructions for the box.

You will  need two pieces of card stock cut to 8 1/2" x 8 1/2".  

The bottom needs to fit the 5 x 5 card so I want the bottom of the box to measure 5 1/4" x 5 1/4".  I scored my paper at 13/16" all the way around, then I scored it at 1 5/8".  Your card stock should look like this...  Just click on the picture to make it bigger if you can't see the score lines.


Now the top of the box needs to be slightly larger than the bottom to fit over it.  I need that to measure 
5 3/8" x 5 3/8".  I score this one at 25/32" all the way around, then I scored it at 1 9/16".  Your card stock should look like this...


Yes, these are strange measurements, and the score lines look the same, but they are slightly different and do work. :)

Now you need to fold each of the score lines.


Now cut the corners like shown.


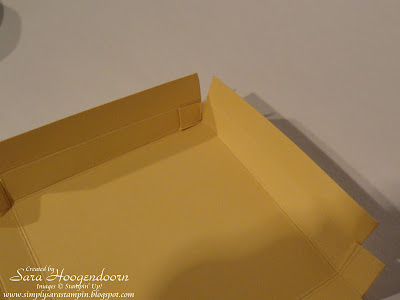
Now use sticky strip to adhere your first flap like shown.


Now fold the flap over the corner piece and adhere.  I used two-way tape all the way along the edge for this part.  Once your tape is on, fold the flap over pressing in the middle first and work your way out to each edge making sure it's nice and tight.  


Tuck the next corner in and repeat steps until finished with the top and the bottom of the box.
Here is the finished box.