Sunday, May 27, 2012

RHSSC 38

Welcome to another Red Hot Stamper's challenge and our last one for May.  I used the Daisies Flower #2 Bigz Die.  I'll sure miss using this one because you could make so many beautiful flowers with it.  Head on over to the Red Hot Stamper's sketch challenge here to see more cards. 


Thanks for looking and have a great day!

Stamp Set:  On Your Birthday
Card Stock:  Whisper White
Classic Stampin' Pads:  Daffodil Delight, Tangerine Tango & Real Red
Punches:  Large Oval & Scallop Oval
Embossing Folder:  Elegant Lines
Bigz Die:  Daisies Flower #2
Ribbon:  3/8" Taffeta in Whisper White
Shimmer Paint:  Champagne Mist

Saturday, May 26, 2012

Lovely as a Tree Father's Day Card

Today's card is another one I did for my May stamp a stack and not only did this set stay in the new catalog, but starting June 1 you can also purchase it as a clear mount!  Yes, I LOVE the clear mount stamps...so much easier to see what you're stamping.  Anyway, I was busy checking out cards for ideas when I saw this card from Tamie.  I liked it so much I had to case it...I just changed the colors.  You can check out her card and visit her blog here.  


Thanks for looking and have a great day!

Stamp Set:  Lovely as a Tree
Card Stock:  Early Espresso & Very Vanilla
Classic Stampin' Pad:  Early Espresso
Embossing Folder: Stripes


Friday, May 25, 2012

Today's card is one that we did at my May stamp a stack and it was a pretty easy card to whip out.  I only used one stamp set, one ink pad and three colors of card stock.  No cutting little things out, punching, embossing or using the Big Shot...not that I mind any of that stuff, but it sure may my prep work easy!! Yup, just sponging and stamping.  Oh, and the ladies told me my cards were pretty easy to do this time!  That was nice to hear. :)  I love this set and was so glad they carried it over to the new catalog!  


Thanks for looking and have a great day!

Stamp Set:  The Open Sea
Card Stock:  Not Quite Navy, Early Espresso & Crumb Cake
Classic Stampin' Pad:  Not Quite Navy
Baker's Twine:  Early Espresso (inked w/ Not Quite Navy)
Sponges

Sunday, May 20, 2012

RHSSC37

Welcome to another Red Hot Stamper's sketch challenge.  This week I used the stamp set Bordering on Romance...so glad that this set carried over!  Visit the Red Hot Stampers Blog here to see a few more cards.


Thanks for looking and have a great day!

Stamp Set:  Boarding on Romance
Card Stock  Cherry Cobbler & Whisper White
Classic Stampin' Pads:  Cherry Cobbler, Garden Green & Daffodil Delight
StazOn:  Black
Embossing Folder:  Elegant Boquet
Ribbon:  1/2" Seam Binding in Cherry Cobbler
Shimmer Paint:  Champagne Mist
Jewels:  Basic Pearls
Blender Pens

Saturday, May 19, 2012

Mother's Day Cards

Well, it's been a bit since I've posted, but we had to leave town for a few days.  Now it's time to play catch up!   I have a feeling with a stamp a stack and school coming to a close with an open house to get ready for my poor blog is going to suffer.  I just keep telling myself, "Just a few more weeks!" and I have all summer to play. :)  Anyway, these are the cards I made for my mother and my mother-in-law for Mother's Day last Sunday.  I saw a few beautiful lattice cards by Michelle here a while ago and thought they would make great Mother's Day cards.  Thanks for the ideas Michelle!


Thanks for looking and have a great day!

Stamp Set:  Fabulous Florets
Card Stock:  Very Vanilla & Lucky Limeade
Classic Stampin' Pads:  Island Indigo & Regal Rose
StazOn:  Black
Punches:  Decorative Label & Scallop Oval
Framelits:  Labels Collection
Shimmer paint:  Champagne Mist
Sponges, Q-tips & Crimper 

Monday, May 7, 2012

Cherry Cobbler Carnation

* I've added instructions at the bottom of this post on how to make carnations *

Well, carnations are my favorite kind of flowers and today's card was inspired by a red carnation my daughter gave me when she stopped by to visit last week...how sweet was that! :)  I figured this flower would be perfect for this week's sketch challenge from Stamping 411 because of the flower on the front of the sketch challenge.  I hope you enjoy the card...and the flower too. :)


I had to show the actual flower too, just couldn't get a very good pic. :(


Thanks for looking and have a great day!

Stamp Sets:  Elements of Style & On Your Birthday
Card Stock:  Basic Black, Cherry Cobbler & Whisper White
DSP: Mocha Morning
Ink:  StazOn Black
Ribbon:  1/2" Seam Binding in Cherry Cobbler
Scissors:  Deckle
Shimmer Paint:  Champagne Mist
Circle Scissor Cutter


First I cut out 6 circles.  My biggest one was 3 ½, then 3 ¼”, 2 ¾”, 2 ¼”, 2” and 1 ¾”.  If you want a smaller flower just start with a smaller circle.  I then cut around the edges with a deckle scissors (Stampin’ Up! sold these a long time ago).  When I cut the four biggest circles I didn’t just cut around the circle I weaved in out a bit.  Kind of like a wave going around the circle.  The last two I didn’t weave back and forth, just cut as close to the edge as possible.  


For the red carnation I sponged just a tinge of the edges with StazOn black ink so the ink doesn’t run. I did this sample with Stampin' Up!'s Classic Stampin' Pad in Marina Mist because I wanted it to run into the Whisper White.  Do it on both sides!


I then make sure I have a few layers paper towels and spray each of the flower pieces with water to get them wet...dab off the extra water.  


Next I crinkle crinkle all the pieces.  Note that if you're using Whisper White or Very Vanilla the card stock is not as thick as the rest of Stampin' Up!'s card stock.  The Cherry Cobbler does not rip as easily as the other two, so handle the lighter card stock with care.  


Now carefully open it back up and straighten the edges as best as you can, but don't pull too hard.  Now let it dry...or dry it with the heat gun because you're too impatient like me! lol  Notice how the ink bled.  You want that!


The final step before putting it together is to use your paper piercing tool to split each piece you have (yes, this is a little tedious, but your patience will pay off!), so you now have two of every piece making twelve pieces.  


Now you just layer them with the biggest on the bottom all the way to the top making sure you vary where the edges are at.  


Once you have them in place on the paper piercing mat use your paper piercing tool to put a hole through all of the layers.  Put a brad through it and close it.  


Now starting with the smallest piece in the middle pull it all up and pinch the piece together.  Do this with every piece. 


The final step is to pull the pieces back to your liking.  And if you like sparkle add a little spritz of Champagne Mist Shimmer Paint.  Hope the instructions were simple and you enjoy making carnations of your own!


Sunday, May 6, 2012

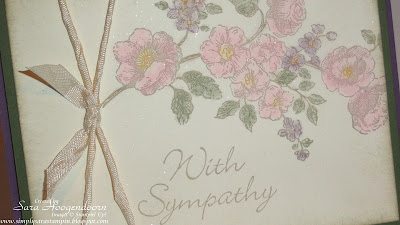
RHSSC 35 - With Sympathy

It's Sunday and that means it's time for another Red Hot Stamper's sketch challenge.  I must say this challenge threw me a little! lol  I happened to see Stamping 411's Color Inspiration #170 post and decided to use their colors.  Then I needed to figure out what stamp set to use.  Well, I needed something big to cover the open side.  Ok, I got that part figured out, but then what to do for ribbon???  I didn't have any that was skinny enough to look good on what I had already done.  That's when I came up with the idea to twist the seam binding ribbon to make it smaller.  Voila!  I managed to come up with this pretty card.  I loved the soft colors and thought I would make it a sympathy for a fellow demonstrator who just lost a loved one.  


If you're in a crafty mood why not give our challenge a try.  You can head  here to see a few other samples too.


Thanks for looking and have a great day!

Stamp Set:  Elements of Style
Card Stock:  Perfect Plum, Always Artichoke & Very Vanilla
Classic Stampin' Pad:  Sahara Sand
Stampin' Pastels:  Perfect Plum, Always Artichoke, 
Pink Pirouette & So Saffron
Ribbon:  1/2" Seam Binding in Very Vanilla
Shimmer Paint:  Champagne Mist