Monday, December 29, 2014

Endless Thank You Wishes

Just a quick post with a bunch of little 3x3 cards today.  I used the Christmas set Endless Wishes, An Open Heart for the Thank You, and the Encore gold and silver ink pads to create this card.  Pretty simple to do. :)  Now on to the reason why I made these...every year my hubby gets gifts on his route from his customers, and we're so thankful for each and every one!  I'm not much of a writer, but I always want them to know how thankful we are that he was on their mind during the holidays. :)


Thanks for looking and have a great day!
Sara

Supplies used on this card:

Built for Free Using: My Stampin Blog

Thursday, December 25, 2014

Merry Christmas!

Wishing everyone a Merry Christmas today!  

I was asked by my dad to make a card for my mom since he likes to give her one every year.  Sure, no problem. :)  Since I was doing water coloring at the time I decided to give it a try again using the retired set Evergreen.  I really like how this one turned out. :)


And another pic from the side.


Thanks for looking and have a Merry Christmas!
Sara

Monday, December 22, 2014

Indescribable Gift

I finally got some new sets from the Occasions Catalog that is coming out on January 6 for Stampin' up and wanted to use all my stamps as soon as I could!  I had a few ideas going through my head, but I've only been able to make this one card so far.  Since my niece's birthday is so close to Christmas I've heard it through the grapevine that she would like cards that are NOT winter themed.  No problem this time around.  I chose to use the new set Indescribable Gift.  It reminds me of an apple tree in my back yard.  Every year I go out and take pics of the thousands of beautiful flowers that bloom on it.  Sometimes I stand under it and take a pic up into the sky.  The blue is just beautiful behind all the lovely flowers.  That's where the inspiration came for this card.  I figured why not add the sun in the background.  I know...it's not yellow, but on bright days like that when the sky is blue it tends to be pretty white. :)


I added this pic so you could see how the flowers shine.  That's from using a VersaMarker and embossing over all the flowers, leaves and branches so I could brayer the sky in the background.


Thanks for looking and have a great day!
Sara

Supplies used on this card:

VersaMarker

Built for Free Using: My Stampin Blog


Friday, December 19, 2014

Lovely as a Tree ~ Watercolor

So glad it's Friday today!  Anyone else?  :)  Today's card is for the Friday Mashup and I finally got around to doing a little water coloring because I've been wanting to do it for quite a while!  Before I go into that a little more, lets check out what our mashup from Holly is...


Create a project using the "Sketch". 
Create a "2 Layer card with a grungy element in the background". 
or Mash it Up! and create a project "using the sketch that's 2 layers only".

I have to admit I cheated a little on the two layer thing, but not because I wanted to!  I was lazy and didn't want to haul out my stamp-a-ma-jig and thought my stamp was on the block straight and it wasn't...err!!  So I had to cut a little sliver of paper and stamp on that and run it across the bottom of the card to cover up my crooked happy birthday.  


Ever since I saw a tutorial over on Splitcoast by Heather T. I've been wanting to try my hand at water coloring.  I've never tried it before other than watercolor wash.  Let me tell you Heather made it look SO easy!  Umm...it wasn't.  At least not for me! lol  She stamped her trees, then spritzed them with water.  When I did that they turned into a big green blob (kind of like the top left corner! lol).  She also added the blue after she stamped her trees.  Again that did NOT work for me!  I ended up doing the blue, letting it dry and then added the trees from Lovely as a Tree.  Then I used water and reinker to go over the tree and make it look like it was kind of water colored.  I certainly won't complain because in the end I like how it turned out for my first time water coloring a scene.  

Make sure you head over to the Friday Mashup HERE to check out all the other fun cards using this week's sketch and two-layered card challenge.


Thanks for looking and have a great day!
Sara

Supplies used on this card:

Built for Free Using: My Stampin Blog

Thursday, December 18, 2014

Shimmering Endless Wishes

I've been so busy I totally forgot to post my card for 'Tis the Season!  I have to say in person this card is just beautiful, but what was I thinking trying to make a card that has heat embossing, the diamond dust technique and metallic silver and gold ink on it.  It was horrible trying to get a decent pic of this card!  From one angle the heat embossing would look great, but the metallic ink pad color would just disappear, or the metallic inks would look great and I couldn't see where I had done the diamond dust technique.  I survived the battle...barely! lol  


Today's card is for our last 'Tis the Season inspiration challenge before Christmas!  I hope you have your Christmas cards done and in the mail.  I do...barely! lol  As you can see I was inspired to use snowflakes and some shimmer and bling.  I didn't stamp the woodgrain on my card, but instead used my embossing folder since I wanted a white background.  Stop by 'Tis the Season's blog to check out all the other great Christmas cards using inspiration challenge #32 HERE
.

I also played along with a sketch challenge.  I wasn't planning on it, but happened to be looking at some blogs I follow and loved what they had over at Hand Stamped Sentiments.  I must say this card went together pretty quickly, it was just the picture part that was so hard! 


Thanks for looking and have a great day!
Sara

Supplies used on this card:

Built for Free Using: My Stampin Blog

Wednesday, December 17, 2014

Open House Make and Take - 3

I never did show this cute little treat box that the ladies made at my open house last month.  It was pretty simple to make too. :)  I used the All is Calm DSP and cut strips of it out to fit around a Tiny Treat Box.  I made sure I knew where I wanted the DSP on the box so I could punch out both the box and DSP at the same time with the Petite Curly Label Punch to leave a window opening. Once I had my box assembled I attached the DSP strip, then used my fast fuse tape to attach a small piece of window sheet on the inside of the box.  As you can see I didn't have any treats in my box.  You'll want to fill it with something yummy, then tie the ribbon around it.  Very simple box to make when you need a bunch of gifts to give out!


Thanks for looking and have a great day!
Sara

Supplies used on this box:

Built for Free Using: My Stampin Blog


Tuesday, December 16, 2014

very merry christmas

I have another Christmas card for you today.  I wasn't planning on this card being a Christmas one, but it seemed to fit with this week's sketch from Try Stampin' on Tuesday.  I used the colors Night of Navy and silver from the Color Me...challenge, but forgot to check when it closed and it was before I could post this card! lol  That's what happens when you don't check things out thoroughly!  One of these days I'll get a chance to play with them again. :)  


I did take Try Stampin' on Tuesday's sketch and turn it on it's side, but that's what's so fun about them...you can rotate them if something pops into your head using the sketch that way instead of the original way!  Make sure you stop by Try Stampin' on Tuesday HERE to check out the other great cards made using this sketch and play along if you get the chance too. :)


I put this pic in because the trees actually look more like this on the card (silver) except you can see all of them clearly.  The top picture makes them look gray and they're not. :(


Thanks for looking and have a great day!
Sara

Supplies used on this card:

Built for Free Using: My Stampin Blog


Friday, December 12, 2014

Lovely as a Tree ~ Silver and Gray

I know it's been a while since I've posted, but I've been pretty busy this week with a couple of stamp a stacks and not feeling the greatest either. :(  I love doing my stamp a stacks, especially in December, but I have to admit I'm looking forward to a relaxing evening tonight and sleeping in really late tomorrow and hopefully I'll be back to normal by then! :)  

Today's card is for the Friday Mashup and I was really hoping for a challenge where I could make a masculine card.  Yup, definitely a challenge that I could do that. :)  This week's fun challenge is from Cindy...

Create a project using "Basic Grey or Smoky Slate & Silver". 
Create a project using "Dry or Heat Embossing". 
or Mash it Up! and create a project "using the colors Silver & Grey with some Embossing".


I was so into using Basic Gray and silver that I totally forgot what the second part of the challenge was...embossing!  Well, I ended up having that covered since I did both heat and drying embossing on my card...whew! lol  Head over to the Friday Mashup HERE to check out the other great cards using silver and gray.  We'd love to have you play along too, so if you get a chance show us what you've made too. 


Thanks for looking and have a great day!
Sara

Supplies used on this card:

Express Yourself (retired)

Built for Free Using: My Stampin Blog


Friday, December 5, 2014

Elegant Ornamental Pine

Wow, is it Friday already?  Where did this week go?!  I've been gone almost every evening, so I know that makes time go by faster.  Luckily I made sure I had enough time to create a pretty clean and simple card for this week's Friday Mashup from Lynda.  This is her mashup for the week... 

Create a project using "Silver or Gold". 
Create a "Christmas Project". 
or Mash it Up! and create a "Christmas-themed Project with Silver or Gold".

I decided to go with gold on my Christmas card.  It was definitely a quick card to make and I love, love, love that since it usually takes me a while to come up with something I like.  Not this time around! :)


Make sure you stop by the Friday Mashup HERE to see other the other great cards and projects the ladies created this week and to play along too. :)


Thanks for looking and have a great day!
Sara

Supplies use on this card:

Pretty Print Embossing Folder (retired)

Built for Free Using: My Stampin Blog

Thursday, December 4, 2014

From Our House To Yours...

Today's card is definitely not my norm since it's pretty plain and simple, but I have to admit I had fun coloring in the house.  I really don't know how to color things in so I just looked around at other cards using this same house that were colored and tried to learn a little bit about basic lighting.  I don't think it turned out too bad for my first try.  Someday I'll get a chance to study and practice it a little more in depth. :)  Anyway this card is for 'Tis the Season's sketch challenge #31.  I really liked this clean and simple sketch, and hope you do too!  


Head over to 'Tis the Season HERE to check out the other fun Christmas cards using this sketch and to play along too.  Christmas is almost here!  


Thanks for looking and have a great day!
Sara

Supplies use on this card:

Built for Free Using: My Stampin Blog


Tuesday, December 2, 2014

Bright and Beautiful

Wow, I sure have skipped out on posting for a while.  I even have a few posts out there waiting for me to add just a bit more, but nope...nothing until today.  And that brings me to this week's sketch challenge from Try Stampin' on Tuesday.  You can see the sketch below and the theme for this week is Peace.  I thought this card is pretty peaceful, but I guess that's not the first word I'd use to describe it.  I'd say more shimmer and shine...and it sure was hard to take a decent pic with the glimmer paper and silver embossing powder.  It's definitely much prettier in person. :)


Make sure you check out the other fun cards at Try Stampin' on Tuesday HERE.  Lots of great cards from all the designers.  Make sure you play along too if you get a chance.  We'd love to see what you create!


Thanks for looking and have a great day!
Sara

Supplies used on this card:

Pretty Print embossing folder (retired)

Built for Free Using: My Stampin Blog


Monday, November 24, 2014

Online Extravaganza!!

 Today's the day...the Stampin' Up! Online Extravaganza!!  The first three things listed are for today only!  The second set is for next Monday, December 1 only!  Everything else is UP to 50% off!!  Each category lists the deals for you.

If you'd like to place an order through me click HERE.  That will take you right to my website, and all you have to do is click on shop in the right hand corner.  Then you will have to log into your account or create an account.  


Thanks for looking and have a great day!
Sara

Friday, November 21, 2014

Shimmering Snowfall

Update...I've added a few pics toward the bottom of this post with some instructions on how I made this first card. :)

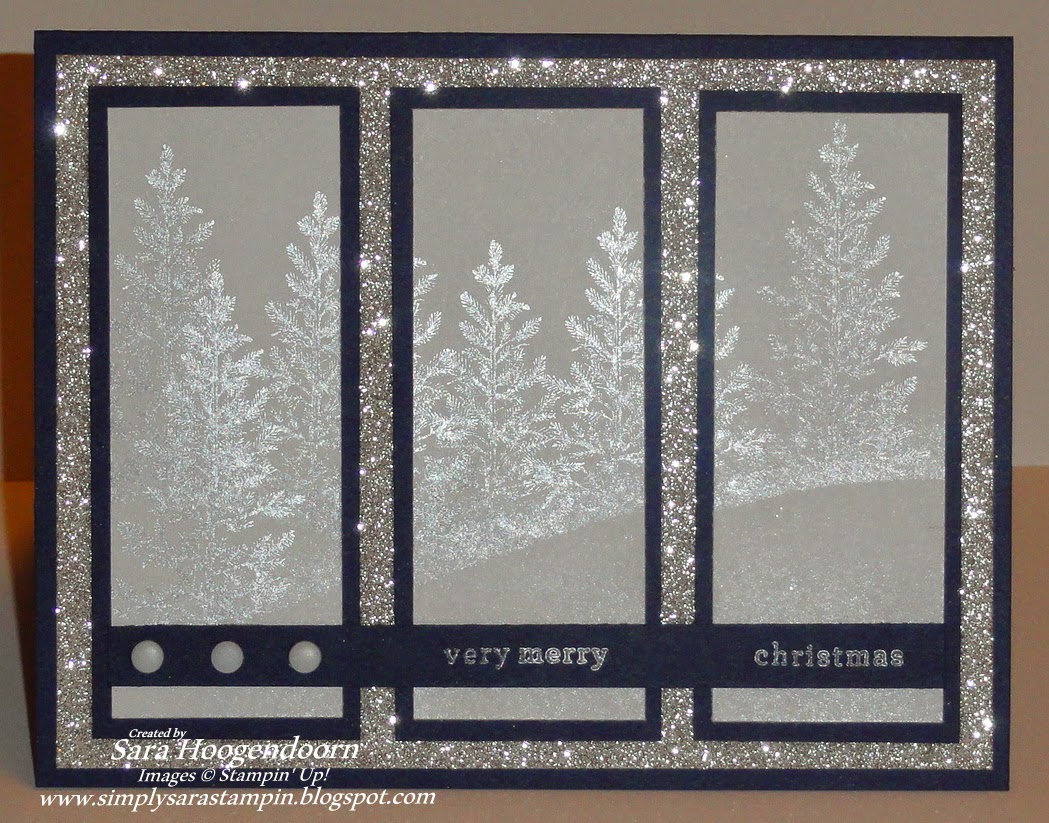
Have you ever taken a walk out in the snow on a cold evening and as you're walking along you can see the snow shimmering everywhere you look when the light hits it just right?  I sure have and that's what inspired this card...well that and the fact that we've had more snow here in Michigan than we know what to do with right now! lol  We're in for a break I think, but I'm not ready for the rain and sloppy mess that we might have the next few days.  Yup, give me a good snow storm over rain and mud when it's cold out!  So this week at the Friday Mashup Avery has challenged us to do a couple of things...

        Create a project using "a Metal Embellishment (Staple, Brad, Grommet etc.)".                    
 Create a project using "Weather as your Inspiration"

 think storms, Clouds, Rain, Sun, Warm Sandy Beaches. 

     or Mash it Up! and create a "Weather inspired project with a Metal Embellishment".


Now you can see why I made a card with snow...the weather was definitely my inspiration!  I added a few retired brads that I had stashed away to use as my metal embellishment.


Lots of great cards over at the Friday Mashup this week.  Check them out HERE and play along when you get a chance.


I'm actually adding a second card to this post also since I was kind of working on both cards at the same time.  Believe it or not I had this picture stashed away to use another time.  I didn't like how it had turned out when I originally made it, so I did a little more work on it until I was happy with what I had. :)  Wish I had taken a pic of it before I started working on it again so you could have seen the difference.  Too late now though!


I hope you've enjoyed my shimmery snow cards. :)
Thanks for looking and have a great day!
Sara

A picture tutorial for you...

Take a 3 1/4" x 4 3/8" piece of whisper white card stock and a scrap piece of paper or sticky note and cut a curve on it like the pic below.  Attache it to your card stock if you don't have a sticky note using a removable adhesive.


Use the embossing buddy, VersaMark pad and oak tree from Lovely as a Tree for the next step.  Ink up the whole tree with the VersaMark pad, and color the trunk gray with a marker after using VersaMark on the whole tree.  Stamp tree using the stamp-a-ma-jig to place it correctly.  Use white embossing powder for top and clear on the trunk.  Yup, that means you need to be careful when putting on the embossing powder.


Punch out a 1" circle on a thin piece of scrap paper and place it where you want the moon in the sky. Now sponge or use a brayer to color the sky (I used a brayer).  I started with Pool Party and brayered it all the way to the yellow piece of scrap paper.


Next sponge or brayer on Island Indigo going down about half way.


The last color you need to sponge of brayer is Night of Navy.  Go down about 1/3 of the way.


Now that you have the sky done lift off your scrap piece of paper and reposition it so you can start sponging your rolling hills. It's hard to tell in this picture, but if you look closely you can see I've sponged Pool Party about half way up the "hill".  I started by the yellow of my scrap paper and sponged my way up.


Next I sponged Island Indigo starting once again at the bottom of the hill and sponging upward.


In this picture you can see that I've finished off my first hill using Night of Navy and repeated the whole process again on the second hill.


Here's my third hill following the same step each time...sponge on Pool Party, Island Indigo and Night of Navy.


Carefully peel off your moon and if there is any sticky residue left use your adhesive remover to get it off.  You can see in this picture that I also finished off the last hill like the previous three.  I just didn't need to use the scrap piece of paper anymore.  To make it shimmery I spritzed the scene with Smooch Spritz.  If I spray it directly from that spritzer it will have bigger clumps.  For a shimmery look without the clumps I mix a bit of Smooch Spritz with 70% rubbing alcohol and spray it using one of the Stampin' Up! spritzer bottles.  Since I needed a thank you card I added that to this card. :)


Instead of using the Chevron embossing folder for this card I used the Stylish Stripes embossing folder.  I used Island Indigo card stock cut at 4"x 5 1/4".  I then layered that on Night of Navy card stock cut at 8 1/2" x 5 1/2" and scored at 4 1/4".


I hope my instructions with pictures helps anyone who wants to give this card a try!  If you have more questions don't hesitate to ask. :)

Supplies used on these cards:

retired brads & sticky notes

Built for Free Using: My Stampin Blog


Thursday, November 20, 2014

Merry!

Today's card is a fun one that I made for 'Tis the Season's 30th Christmas card challenge.  As you can see this week we have a color challenge for you.  I really liked working with these colors, that's for sure!  Make sure you head over to 'Tis the Season's blog HERE to see what the other designers made...pretty nice cards!  Oh, and don't forget to play along.  Christmas will be here before you know it!


I can't forget to say where I got my design for this card...it's from Stampin' Celebration.  I don't get to play with other challenges very often and this is one I used to play with pretty regularly.  They have a great sketch so I couldn't resist using it this time. :)


Thanks for looking and have a great day!
Sara 

Supplies used on this card:

I'll have to add these later...I can't get my page to load. :(

Tuesday, November 18, 2014

pssst...you make me HAPPY

Happy Tuesday, Everyone!  Here in my crazy part of  Michigan we're still in the midst of a snowstorm.  I can't believe how much snow we've had and it's only November 18!  Well as you can see all the snow made me think of warmer weather. lol  I just needed a break from Christmas cards and came up with this card instead.  The sketch is from this week's Try Stampin' on Tuesday sketch challenge #194, and the theme is Twice is Nice.


Well, the "Twice is Nice" on my card are the symmetrical wings on the butterfly.  I tell ya I just was not sure what else to do! lol  Make sure you head over to Try Stampin' on Tuesday HERE to check out all the cards from the rest of the design team.  They are great! 


Just another quick pic. :)  Guess I forgot to mention how I did this card, so I figured I should pop back in and let you know.  I stamped the butterfly with memento ink and colored it in with Coastal Cabana Blendabilities.  Then I inked it up everywhere with VersaMark, covered it with Heat and Stick powder and heated it.  Then I covered it with Dazzling Diamonds and heated it one more time.


Thanks for looking and have a great day!
Sara

Supplies used on this card:

Happy Watercolor - retired

Built for Free Using: My Stampin Blog


Sunday, November 16, 2014

Open House Make & Take -1

Today I'd like to show you my first make and take that I had at my open house last week.  Since I did the diamond dust technique previously on a Friday Mashup challenge I decided I wanted to do it with the cardinal stamp Beauty of the Season from the Holiday catalog.  I definitely think this was the ladies' favorite!


This pic doesn't look too bad, but seeing the diamond dust technique in person is SO much better!  I stamped it with Memento Ink in Tuxedo Black and colored the cardinal in with Cherry Cobbler and Pumpkin Pie Blendabilities. I also used the Stampin' Write Basic Black for the branches and on the bird, plus Basic Gray for his legs.  I didn't have enough candy dots for everyone coming and didn't feel like making my own, so I used the cupcake punch to punch out three circles. 

Thanks for looking and have a great day!
Sara

Supplies used to make this card:

Built for Free Using: My Stampin Blog